Array ( [0] => 280 [ID] => 280 [1] => 1 [TYPEID] => 1 [2] => 0 [SECTIONID] => 0 [3] => project-details [MOD_NAME] => project-details [4] => [TITLE] => [5] => Project Details [META_TITLE] => Happy Anniversary in Silver Delicata [6] => [META_DESCRIPTION] => Happy Anniversary in Silver Delicata [7] => [META_KEYWORDS] => [8] => [BUTTON_TITLE] => [9] => [BODY] => [10] => [BODY_SIDE] => [11] => [MODULE_PROCESSING] => [12] => [MODULE_META] => [13] => project-details-head.php [MODULE_HEAD] => project-details-head.php [14] => project-details-body.php [MODULE_BODY] => project-details-body.php [15] => [MODULE_SIDE] => [16] => 0 [TOP_ORDER] => 0 [17] => 0 [HITS_UNIQUE] => 0 [18] => 0 [HITS_REPEAT] => 0 [19] => 0 [ROBOT_HITS] => 0 [20] => 0000-00-00 00:00:00 [LASTVIEWED] => 0000-00-00 00:00:00 [21] => 0000-00-00 00:00:00 [ROBOT_LASTVIEWED] => 0000-00-00 00:00:00 [22] => 0.70 [PRIORITY] => 0.70 [23] => 1 [SITEMAP] => 1 [24] => 1 [ACTIVE] => 1 [25] => 1 [DISPLAY_TITLE] => 1 [26] => 0 [SSL_MODE] => 0 [27] => 0 [EDITABLE] => 0 [28] => 0 [DELETABLE] => 0 [29] => 2013-11-05 00:00:00 [LASTUPDATED] => 2013-11-05 00:00:00 [30] => 2013-11-05 00:00:00 [CREATED] => 2013-11-05 00:00:00 )
Imagine Crafts
LearnMakeCommunityShop

Happy Anniversary in Silver Delicata

Celebrate this special milestone with beautiful silver highlights.


Happy Anniversary in Silver Delicata
  1. On your Craft Mat, smoosh Delicata Silvery Shimmer and Golden Glitz inks. Spritz with water.
     
  2. Swirl white card stock around in the watered down inks. When you are pleased with the effect, let dry.
     
  3. Stamp and heat emboss sentiment with silver embossing powder.
     
  4. Dry emboss a small scrap of white card stock with Polka Dots folder and then ink with Delicata Silvery Shimmer. Add this section to the bottom of the sentiment panel to form a card front that measures 4 x 5-1/4 inches.
     
  5. Wrap gray ribbon around card front to cover the "seam".
     
  6. Die cut and heat emboss Star with silver embossing powder. The one pictured has been heat embossed three times. Tie cord in button holes and adhere to ribbon.
     
  7. Assemble hat pin and beads as desired. Slide pin behind star embellishment.
     
  8. Adhere card front to a black card base measuring 4-1/4 x 5-1/2 inches using foam adhesive.
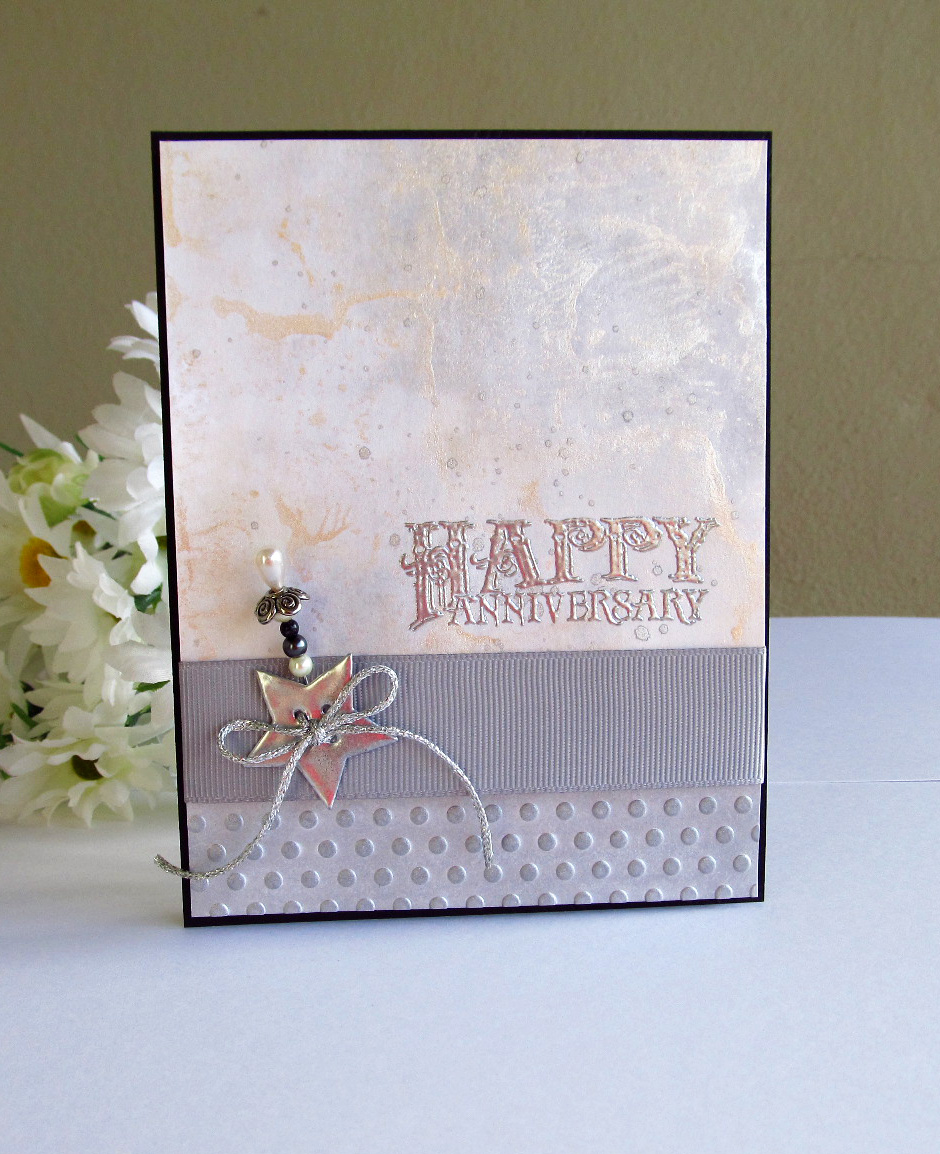
by Penny Ward

Difficulty

Intermediate

Time

45 minutes

Materials Needed

Imagine with Tsukineko:

Other:

  • Penny Black: Sentimental stamp
  • Provo Craft: Polka Dot embossing folder
  • Darice: Hat pin & beads
  • Die-Versions: Buttons Galore die
  • Kreinik: Silver cord
  • American Crafts: Gray ribbon
  • Craftwell: Ebosser
  • Scotch Foam Adhesive


Sign up for our newsletter
Facebook Pinterest Twitter YouTube Vimeo