Array ( [0] => 280 [ID] => 280 [1] => 1 [TYPEID] => 1 [2] => 0 [SECTIONID] => 0 [3] => project-details [MOD_NAME] => project-details [4] => [TITLE] => [5] => Project Details [META_TITLE] => Birthday Board Calendar made with StazOn Ink [6] => [META_DESCRIPTION] => Birthday Board Calendar made with StazOn Ink [7] => [META_KEYWORDS] => [8] => [BUTTON_TITLE] => [9] => [BODY] => [10] => [BODY_SIDE] => [11] => [MODULE_PROCESSING] => [12] => [MODULE_META] => [13] => project-details-head.php [MODULE_HEAD] => project-details-head.php [14] => project-details-body.php [MODULE_BODY] => project-details-body.php [15] => [MODULE_SIDE] => [16] => 0 [TOP_ORDER] => 0 [17] => 0 [HITS_UNIQUE] => 0 [18] => 0 [HITS_REPEAT] => 0 [19] => 0 [ROBOT_HITS] => 0 [20] => 0000-00-00 00:00:00 [LASTVIEWED] => 0000-00-00 00:00:00 [21] => 0000-00-00 00:00:00 [ROBOT_LASTVIEWED] => 0000-00-00 00:00:00 [22] => 0.70 [PRIORITY] => 0.70 [23] => 1 [SITEMAP] => 1 [24] => 1 [ACTIVE] => 1 [25] => 1 [DISPLAY_TITLE] => 1 [26] => 0 [SSL_MODE] => 0 [27] => 0 [EDITABLE] => 0 [28] => 0 [DELETABLE] => 0 [29] => 2013-11-05 00:00:00 [LASTUPDATED] => 2013-11-05 00:00:00 [30] => 2013-11-05 00:00:00 [CREATED] => 2013-11-05 00:00:00 )
Imagine Crafts
LearnMakeCommunityShop

Birthday Board Calendar made with StazOn Ink

Make a calendar to keep up with all the birthdays in your family or friends. Attention, teachers: A great decor piece for your classroom.
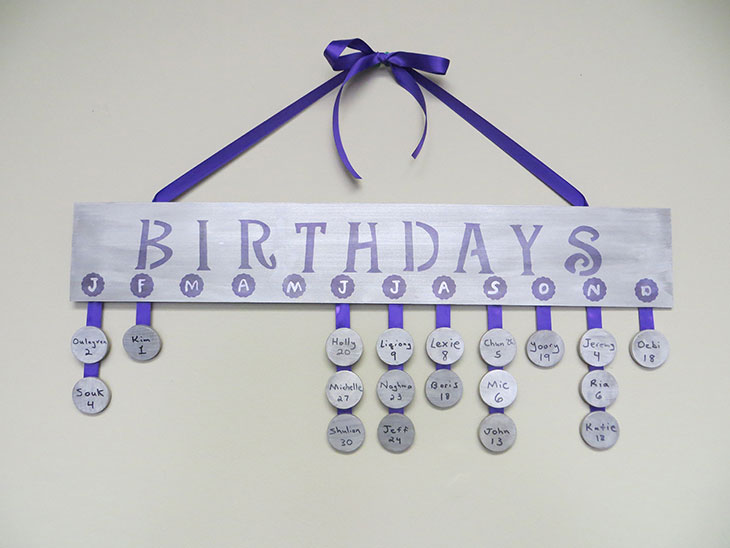

Birthday Board Calendar made with StazOn Ink - January crafting project
  1. Using an InkBlusher, cover wood strip with StazOn Metallic Silver Ink.
     
  2. Using alphabet stencils and an InkBlusher, stencil “Birthdays” on basswood strip in StazOn Royal Purple Ink.
     
  3. Withan InkBlusher, stencil the flower shape 12 times in StazOn Royal Purple Ink along the length of the basswood strip below “Birthdays”.
     
  4. With a Fantastix, draw the first letter of each month on the stenciled flower shapes in StazOn Metallic Silver Ink.
     
  5. With an InkBlusher, cover each wood circle with StazOn Metallic Silver Ink. Allow to dry.
     
  6. With a black marker, write names and birthdates on wood circles.
     
  7. Cut 12 (or as many as needed) strips of ribbon.
     
  8. With glue gun, adhere each strip of ribbon to the back of the wood board below each stenciled flower shape.
     
  9. With glue gun, adhere each wood circle to the ribbon under the appropriate month in date order. Trim off any excess ribbon.
     
  10. Cut 22" piece of ribbon. With glue gun, adhere both ends of ribbon to the back of the board at opposite ends to form the hanger.
     
  11. Cut 18" piece of ribbon and tie into a bow. Trim the ends. With glue gun, adhere bow to the center of the ribbon hanger.
by Naghma Husain

Difficulty

Beginner

Time

2-4 Hours

Materials Needed

From IMAGINE Crafts/Tsukineko

  • StazOn Inks in Metallic Silver and Royal Purple
  • InkBlushers
  • Fantastix Applicator in Brush Tip
  • Hand-Cut Monterey Pine Circles
     
  • Wood strip: 1/8" x 4" x 24"
  • Alphabet stencils 2"
  • Flower stencil 1"
  • Black marker
  • Purple ribbon 5/8"
  • Hot glue gun


Sign up for our newsletter
Facebook Pinterest Twitter YouTube Vimeo