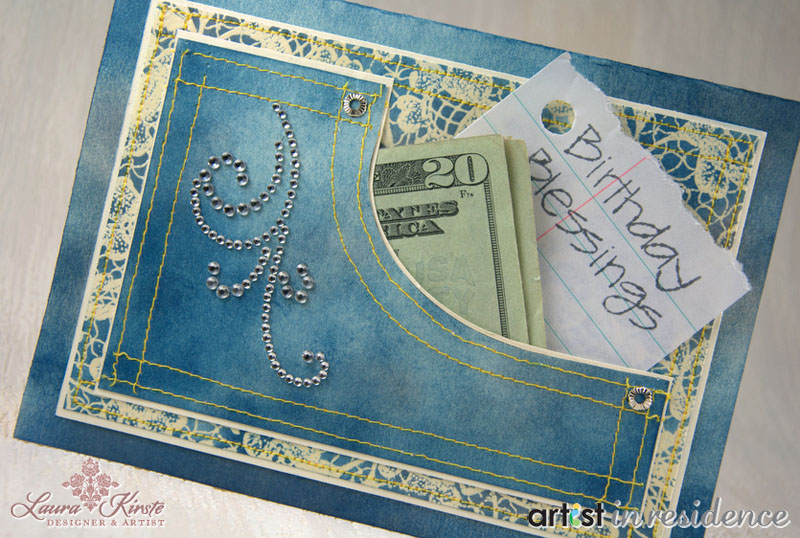
make / by product / denim pocket card for cash gifts
Denim Pocket Card for Cash Gifts
Blend Memento Inks to create a denim look on cardstock.

-
From white or ivory card stock cut 1 of each of the following: 9 ½” X 6 ½”, 4 1/8” X 5 7/8”, 4” X 5 ¾”, 3 ½” X 5 ¼”, 3 3/8” X 5 1/8”. Fold largest piece (9 1/2” X 6 ½”) to make a 4¾” X 6 ½” card.
-
To achieve denim-look use the Finger Dauber to lightly pounce Gray Flannel ink randomly along edges of card front. Continue with Danube Blue ink over Gray Flannel and covering all edges of card front.
-
Ink Floral Thread background stamp with VersaMark and stamp on 4” X 5 3/4” paper, repeat to cover. Sprinkle with clear embossing powder, use heat gun to set.
-
With Finger Dauber rub Gray Flannel ink in circular motions randomly over embossed paper. Continue with Danube Blue ink over Gray Flannel to cover entire embossed paper.
-
Lightly glue center only of inked embossed paper to center of 4 1/8” X 5 7/8” paper to create a “frame”. Using yellow thread, stitch a double row of stitches through both papers along all four edges of embossed paper. Tip: stitching through glue can make the needle stick and threads break, so leave stitching areas free of glue.
-
Glue stitched embossed paper to center front of inked card.
-
On smallest paper (3 3/8” X 5 1/8”) use Sponge Dauber to rub Gray Flannel in in circular motions randomly on paper. Continue with Danube Blue ink over Gray Flannel to cover entire paper. To create worn denim-look leave some areas light and some dark. Darken corners and leave center blotchy light and dark.
-
To create pocket cut a gentle curve from denim paper as shown. It helps to use an oval die cut shape to draw the perimeter and then cut the tips off straight.
-
Using yellow thread, stitch a double row of stitches along all edges of pocket.
-
Lightly glue pocket to center of 3 ½” X 5 ¼” paper to create a “frame”. Cut frame (ivory/white paper) around pocket curve leaving a little showing beyond pocket edge. Apply rhinestone settings/brads to corners of pocket curves as shown.
-
Apply glue to back of pocket along straight edges only. Adhere pocket to center front of card allowing the curve of the pocket to bulge slightly for ease of slipping note/object inside pocket. Apply bling to pocket as shown.
-
Add note/money/flower or other message/treat inside pocket. Option: For pencil-look, use Gray Flannel ink for sentiment on cut and torn piece of lined school paper.
