Array ( [0] => 280 [ID] => 280 [1] => 1 [TYPEID] => 1 [2] => 0 [SECTIONID] => 0 [3] => project-details [MOD_NAME] => project-details [4] => [TITLE] => [5] => Project Details [META_TITLE] => Kaleidacolor Ink for Full Bloom Greeting Card [6] => [META_DESCRIPTION] => Kaleidacolor Ink for Full Bloom Greeting Card [7] => [META_KEYWORDS] => [8] => [BUTTON_TITLE] => [9] => [BODY] => [10] => [BODY_SIDE] => [11] => [MODULE_PROCESSING] => [12] => [MODULE_META] => [13] => project-details-head.php [MODULE_HEAD] => project-details-head.php [14] => project-details-body.php [MODULE_BODY] => project-details-body.php [15] => [MODULE_SIDE] => [16] => 0 [TOP_ORDER] => 0 [17] => 0 [HITS_UNIQUE] => 0 [18] => 0 [HITS_REPEAT] => 0 [19] => 0 [ROBOT_HITS] => 0 [20] => 0000-00-00 00:00:00 [LASTVIEWED] => 0000-00-00 00:00:00 [21] => 0000-00-00 00:00:00 [ROBOT_LASTVIEWED] => 0000-00-00 00:00:00 [22] => 0.70 [PRIORITY] => 0.70 [23] => 1 [SITEMAP] => 1 [24] => 1 [ACTIVE] => 1 [25] => 1 [DISPLAY_TITLE] => 1 [26] => 0 [SSL_MODE] => 0 [27] => 0 [EDITABLE] => 0 [28] => 0 [DELETABLE] => 0 [29] => 2013-11-05 00:00:00 [LASTUPDATED] => 2013-11-05 00:00:00 [30] => 2013-11-05 00:00:00 [CREATED] => 2013-11-05 00:00:00 )
Imagine Crafts
LearnMakeCommunityShop

Kaleidacolor Ink for Full Bloom Greeting Card

Create stunning backgrounds with Kaleidacolor Tomato Vine.
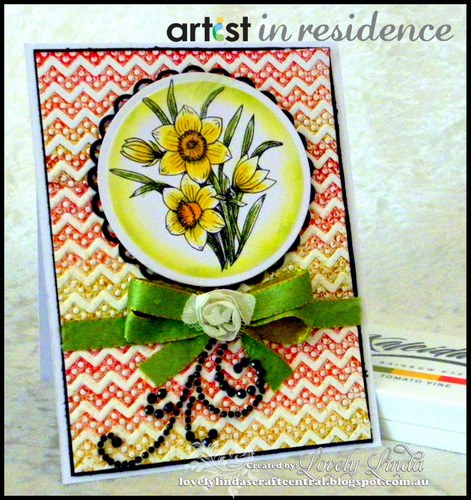

Kaleidacolor Ink for Full Bloom Greeting Card
  1. Ink the So Trendy M-Bossabilities Folder using a brayer loaded with Kaleidacolor Tomato Vine ink.
     
  2. Insert white cardstock piece (cut to 3¾˝ x 5˝) into the embossing folder and emboss.
     
  3. Stamp the daffodil image using Versafine Onyx Black.
     
  4. Color the stamped image with Memento Markers as shown.
     
  5. Die cut/emboss the colored daffodil image using the Standard Circles (large).
     
  6. Leaving the imagine inside of the stencil, use the circle die as a stencil and color the inside edge of the image with Memento Bamboo Leaves using a Sponge Dauber.
     
  7. Die cut one Nestabilities Lacey Circles from black cardstock.
     
  8. Adhere colored daffodil image on top with dimensional squares.
     
  9. Cut layering piece from black cardstock measuring 4˝ x 5¼˝.
     
  10. Adhere black layering piece to the white card base (cut/scored to finished size of 4-¼˝ x 5-½˝), then add the top layering piece (embossed background and daffodil).
     
  11. Attach ribbon below the layered image.
     
  12. Adhere flower to the center of the bow.
     
  13. Finish by adding Swirls Finesse Black Rhinestones below the bow.
by Linda Lucas

Difficulty

Intermediate

Time

45 minutes

Materials Needed

IMAGINE Crafts/Tsukineko:

Miscellaneous:

  • Spellbinders: Grand Calibur Machine; M-Bossabilities So Trendy Folder; Nestabilities Lacey Circles
  • Flourishes: Daffodil stamp
  • Want2Scrap: Swirls Finesse Black Rhinestones
  • May Arts: ribbon
  • Scrapbook Adhesives by 3L E-Z Adhesive Runner 
  • Dimensional foam tots
  • Fabric flower
  • Cardstock (white, black)


Sign up for our newsletter
Facebook Pinterest Twitter YouTube Vimeo