Array ( [0] => 280 [ID] => 280 [1] => 1 [TYPEID] => 1 [2] => 0 [SECTIONID] => 0 [3] => project-details [MOD_NAME] => project-details [4] => [TITLE] => [5] => Project Details [META_TITLE] => Make a keepsake for your next wedding event. [6] => [META_DESCRIPTION] => Make a keepsake for your next wedding event. [7] => [META_KEYWORDS] => [8] => [BUTTON_TITLE] => [9] => [BODY] => [10] => [BODY_SIDE] => [11] => [MODULE_PROCESSING] => [12] => [MODULE_META] => [13] => project-details-head.php [MODULE_HEAD] => project-details-head.php [14] => project-details-body.php [MODULE_BODY] => project-details-body.php [15] => [MODULE_SIDE] => [16] => 0 [TOP_ORDER] => 0 [17] => 0 [HITS_UNIQUE] => 0 [18] => 0 [HITS_REPEAT] => 0 [19] => 0 [ROBOT_HITS] => 0 [20] => 0000-00-00 00:00:00 [LASTVIEWED] => 0000-00-00 00:00:00 [21] => 0000-00-00 00:00:00 [ROBOT_LASTVIEWED] => 0000-00-00 00:00:00 [22] => 0.70 [PRIORITY] => 0.70 [23] => 1 [SITEMAP] => 1 [24] => 1 [ACTIVE] => 1 [25] => 1 [DISPLAY_TITLE] => 1 [26] => 0 [SSL_MODE] => 0 [27] => 0 [EDITABLE] => 0 [28] => 0 [DELETABLE] => 0 [29] => 2013-11-05 00:00:00 [LASTUPDATED] => 2013-11-05 00:00:00 [30] => 2013-11-05 00:00:00 [CREATED] => 2013-11-05 00:00:00 )
Imagine Crafts
LearnMakeCommunityShop

A Day to Remember - Keepsake Wedding Craft

There is something undeniably beautiful about a wedding - friends and family come together to support and celebrate those exchanging vows and becoming one. Make a keepsake for your next wedding event. 
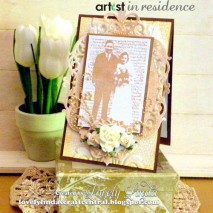

Make a keepsake for your next wedding event.

Directions

AIR 2015_LL_May_Wedding_Step1

1. Cut Tack N Peel to  fit unmounted stamp

2. Adhere as per instructions on Tack N Peel Packet

AIR 2015_LL_May_Wedding_Step2

3. Adhere stamp to acrylic block

4. Stamp image onto White cardstock using Vintage Sepia

5. Remove Tack N Peel attaching the protective films

NOTE: Tack N Peel can be used over and over again

6. Trim stamped image to size

7. Adhere to slightly larger cardstock using Crafty Foam Tape

2015-04-12 AIR 2015_LL_May_Wedding_Tutorial_Step3

8.Cut/emboss Fleur de Elegance

9. Lightly spritz the Die Cut using Sheer Shimmer Spritz in Gold

10. Lightly spritz the Die Cut using Sheer Shimmer Spritz in Copper

11. Allow to dry

12. Cut brown cardstock to 4"x 6"

13. Cut wallpaper slightly smaller

14. Sponge around the edges of the the wallpaper using Delicata in Golden Glitz and Sponge Dauber

15. Adhere to the precut card base.

16. Adhere Wedding image to the layered card base using Foam Tape

2015-04-014 AIR 2015_LL_May_Wedding_Step4

17. Sponge tag around the edges using Delicata Golden Glitz and a Sponge Dauber

18. Adhere paper roses to the tag using liquid glue

19. Trim and attach Swirls Finesse Flourishes

 
by Linda Lucas

Difficulty

Intermediate

Time

45 min + dry time

Materials Needed

Imagine Crafts featuringt Tsukineko: 

Other

  • Spellbinders: S4-475 Fleur de Elegance Nestabilities®  Decorative Accents; Grand Calibur Die Cutting and Embossing Machine
  • Miscellaneous: White and brown cardstock, Flocked Wallpaper, Mulberry Paper Roses, liquid glue, double-sided tape, foam tape, scissors, image stamp, Want2Scrap: Swirls Finesse - Le Creme - Self Adhesive


Sign up for our newsletter
Facebook Pinterest Twitter YouTube Vimeo