Array ( [0] => 280 [ID] => 280 [1] => 1 [TYPEID] => 1 [2] => 0 [SECTIONID] => 0 [3] => project-details [MOD_NAME] => project-details [4] => [TITLE] => [5] => Project Details [META_TITLE] => Happy 4th of July Card [6] => [META_DESCRIPTION] => Happy 4th of July Card [7] => [META_KEYWORDS] => [8] => [BUTTON_TITLE] => [9] => [BODY] => [10] => [BODY_SIDE] => [11] => [MODULE_PROCESSING] => [12] => [MODULE_META] => [13] => project-details-head.php [MODULE_HEAD] => project-details-head.php [14] => project-details-body.php [MODULE_BODY] => project-details-body.php [15] => [MODULE_SIDE] => [16] => 0 [TOP_ORDER] => 0 [17] => 0 [HITS_UNIQUE] => 0 [18] => 0 [HITS_REPEAT] => 0 [19] => 0 [ROBOT_HITS] => 0 [20] => 0000-00-00 00:00:00 [LASTVIEWED] => 0000-00-00 00:00:00 [21] => 0000-00-00 00:00:00 [ROBOT_LASTVIEWED] => 0000-00-00 00:00:00 [22] => 0.70 [PRIORITY] => 0.70 [23] => 1 [SITEMAP] => 1 [24] => 1 [ACTIVE] => 1 [25] => 1 [DISPLAY_TITLE] => 1 [26] => 0 [SSL_MODE] => 0 [27] => 0 [EDITABLE] => 0 [28] => 0 [DELETABLE] => 0 [29] => 2013-11-05 00:00:00 [LASTUPDATED] => 2013-11-05 00:00:00 [30] => 2013-11-05 00:00:00 [CREATED] => 2013-11-05 00:00:00 )
Imagine Crafts
LearnMakeCommunityShop

Happy 4th of July Card

Share your patriotism with this simple card.
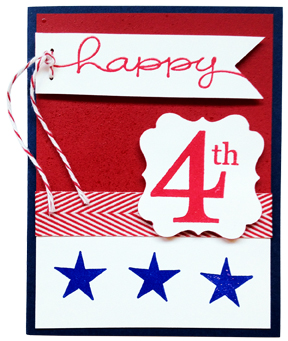

Happy 4th of July Card
  1. Dimensions: finished card size 4-1/4” x 5-1/2” (blue cardstock). Cut 1 piece of white cardstock to 1-3/4” x 3-7/8” and cut 1 piece of red cardstock to 3-1/2” x 3-7/8”.
     
  2. Spray Goosebumps onto red cardstock piece; allow to dry completely.
     
  3. Stamp 3 stars with VersaColor Indigo onto the white cardstock piece. Emboss stars with Clear Embossing Powder.
     
  4. Adhere white cardstock onto the red cardstock piece at the bottom, lining up edges.
     
  5. Cut 4-1/4” length of ribbon and adhere on the backside over the seam where the red and white cardstock pieces meet.
     
  6. Stamp “happy” and “4th” onto white cardstock with VersaColor in Cardinal. Emboss both with Clear Embossing Powder.
     
  7. Use die cut to cut frame around “4th”.
     
  8. Trim around “happy” to create a strip approximately one inch high. Create a pennant by making a dove-tail cut at the end of this piece after the “y”.
     
  9. Punch 2 holes before the “h” in “happy”. String 6 inches of baker’s twine through the holes then tie into a double knot.
     
  10. Adhere background piece onto the blue card base. Adhere “happy” pennant and framed “4th” onto the card.
by Maureen Cronin

Difficulty

Beginner

Time

1 hour

Materials Needed

IMAGINE / Tsukineko:

Other

  • Happy, Star, 4th stamps (Stampin’ Up)
  • Red, white and blue cardstock
  • May Arts Ribbon (red and white chevron)
  • baker’s twine (red and white)
  • 1/4” hole punch
  • scalloped die cut


Sign up for our newsletter
Facebook Pinterest Twitter YouTube Vimeo